Hello everybody. This will be my first tutorial. I’ve been asked several times before how I am able to make the moving gifs of my photo’s from my Nishika. Off course, there are many ways to get there, I will just show you how the way I do it. At the bottom of the post I have links to many Nishika posts and images.

In the old days you could send your film shot by your Nishika out to their development lab and you could get back a 3-D image, but I feel the digital gif version works just as well.
This isn’t relevant at all, but a couple of months ago I came across an original instructions for the Nishika featuring Vincent Price on youtube.
This tutorial will work with images you get from your Nishika or Nimslo or some Lomo cameras that are capable of shooting multiple frames at the same time.
Okay, lets get on to the tutorial.
Step 1:
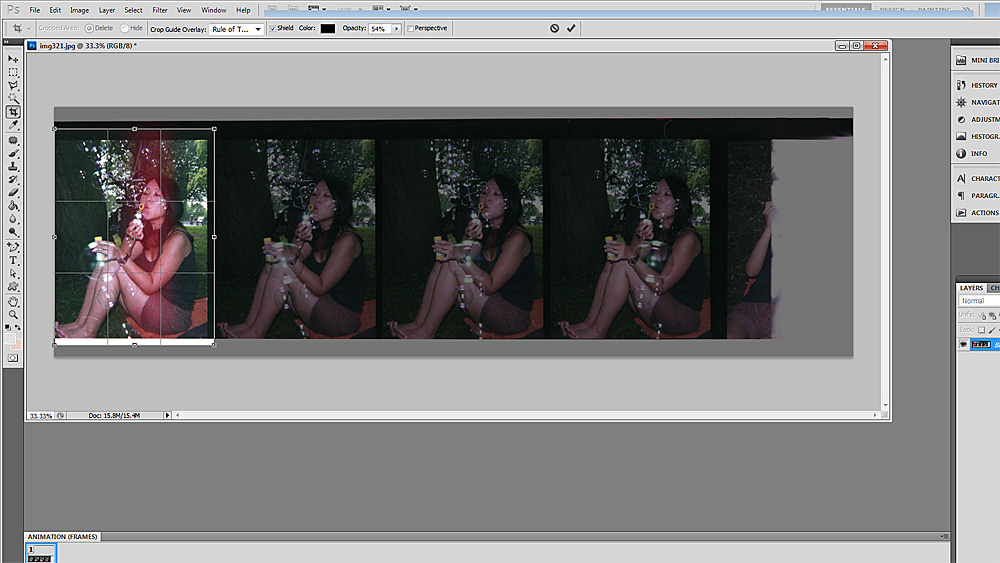
Open your scan with strip of 4 photos in Photoshop. Make sure to horizontally flip your photo if it is in a mirror image.

Step 2:
Crop each image from left to right then saving them and naming them 1, 2, 3 and 4. You don’t have to crop too tightly, when you have them all layered later on in one image you can crop them there. Plus I like leaving a bit of the border on there, just for the retro look.

Step 3:
Now go to Scripts and load files from stack

Step 4:
Select you 4 crops named 1,2,3 and 4 and wait for Photoshop to layer them in one image for you.

Step 5:
Rearrange the layers into this order.
Step 6:
Turn off the view of layer 3 and 4. While selecting layer 2 drop the opacity or fill down to around 50% and use the “”move tool” in Photoshop to slide the image over each other to match up layer 2 with layer 1. Now here the decision is up to you what you want to have as a focal point. When I take photo’s of people I try to make sure their eyes are lined up. In this case I used the yellow bubble blower thing since it was the easiest to find.

Step 7:
Once you have done the same for layer 3 and 4. Then you can make a copy of layer 2 and 3 and put them in the order shown above to get a nice smooth repeating gif.

Step 8:
Make sure you have the animation selected in windows and you will have a nice window at the bottom of your screen.

Step 9:
Left click on the arrow and menu on the animation bar and select “make Frames from Layers”

Step 10:
Now your layers are loaded as frames of your animation. All is left to do is select your play speed. I like to use other to select 0.05 But it is up to you to decide what feels right. Also depending on big the image is the animation may play slowly if you using too much RAM. (well that’s my guess anyway).

Step 11:
Finally time to save your GIF by selecting “”save for web & devices””.

Step 12
Here you have some options to resize your gif or use “”lossy”” to make the GIF smaller. I am sure there are better tutorials out there that will show you how to optimize a GIF. Don’t forget that GIFS can become very big very quickly, so I try to keep mine at a max of 1mb and 500px in height. But again there are many different ways to skin a cat. (what a weird expression, I feel I should look it up where it came from, but I also appreciate the mystery).

So good luck everybody. Share some of the results if this works. If you still have questions leave a message below or email me at lostaruban@gmail.com
Original Review of the Nishika camera and first shots
Nishika in the Netherlands
Countdown in Brussels
Second attempt in Singapore
Nishika goes international
3D Nishika in Europe

![lostaruban halloween nishika (3)[3]](https://lostaruban.files.wordpress.com/2016/02/lostaruban-halloween-nishika-33.gif "lostaruban halloween nishika (3)[3]")
")
")
")
")
")
")
")
")
")
")
")